Are you ready to take your meal prep game to the next level? If you have a subconscious desire to serve others through healthy and delicious meals, then mastering whole foods meal prep is the perfect opportunity for you.
With these tips and tricks, you’ll learn how to plan, organize, and cook your meals in a way that is efficient and satisfying.
In the first section, we’ll dive into the importance of planning your meals. By taking the time to think ahead and create a meal schedule, you’ll be able to ensure that you have all the ingredients you need and eliminate any last-minute stress.
Next, we’ll explore the essential ingredients that should always be stocked in your pantry. From grains and legumes to spices and herbs, having a well-stocked pantry will make meal prep a breeze.
Once you have your ingredients ready, we’ll move on to the fun part – preparing and organizing them. You’ll learn how to chop, slice, and dice like a pro, while also finding ways to store your ingredients in a way that keeps them fresh and easily accessible.
After that, we’ll discuss the concept of batch cooking, which will save you time and energy in the long run.
Finally, we’ll cover the best practices for storing and reheating your meals, ensuring that they stay fresh and delicious until you’re ready to enjoy them.
So, are you ready to become a master of whole foods meal prep? Let’s get started!
Key Takeaways
- Plan your meals in advance to avoid wasting food or having it spoil in the fridge.
- Make sure to store your meals properly in airtight containers to keep them fresh for up to 4 days.
- When reheating your meals, follow proper guidelines to ensure they taste delicious and maintain their quality.
- Take advantage of whole foods in your meal prep to create nutritious and satisfying meals.
Planning Your Meals
Now that you’ve got your shopping list ready, it’s time to start planning your meals for the week. This is where the real magic happens – turning those ingredients into delicious and nutritious meals that will fuel you throughout the day.
Start by thinking about what you enjoy eating and what meals you want to have during the week. Are you a fan of Mexican cuisine? How about Italian? Once you have a general idea, you can start brainstorming specific recipes and dishes that align with your preferences.
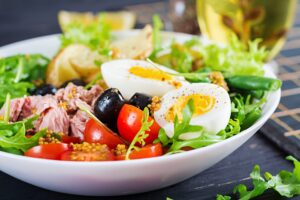
Next, consider the nutritional value of the meals you plan to make. A well-balanced meal should include a source of protein, healthy fats, and plenty of vegetables. Think about incorporating lean meats like chicken or fish, as well as plant-based proteins like beans or tofu. Don’t forget to add some healthy fats like avocados or nuts, which are not only delicious but also provide essential nutrients for your body. And of course, load up on colorful vegetables to ensure you’re getting a wide range of vitamins and minerals.
Embrace Simple Solutions for Busy Days
When things get hectic, look for meals that are quick to prepare or require minimal effort. Overnight oats, pre-washed salad greens, or frozen fruits are easy options for fast breakfasts and snacks that don’t sacrifice nutrition. Roasting a big tray of vegetables once can save time throughout the week by adding flavor and variety to multiple meals.
For lunch, consider prepping a large batch of a grain base—such as quinoa, rice, or farro—and combine it with different proteins, vegetables, and dressings to create balanced meals in minutes. Dinners can be kept simple with one-pan meals, stir-fries, or stews that just need reheating.
Plan for Flexibility
Meal planning doesn’t have to be rigid. Include a few meals that require no cooking—like wraps, salads, or grain bowls—for days when your schedule changes or motivation dips. This kind of flexibility can help you stay consistent with your goals without feeling overwhelmed.
Involving Your Family in Meal Planning
Including your family in the meal planning process can make weekly prep more enjoyable and efficient. When everyone has a chance to suggest favorite meals or fun theme nights, like Taco Tuesday or Stir-Fry Saturday, it builds excitement around mealtime and helps ensure the menu has something for everyone.
Collaborating also takes the pressure off one person to come up with ideas. With input from the whole household, you’ll have a ready list of go-to meals, which helps avoid decision fatigue and repetitive menus. This shared approach encourages variety, saves time, and makes everyone feel more invested in the food being prepared.
Stocking Your Pantry with Essential Ingredients
First things first, let’s make sure your pantry is stocked with all the must-have ingredients. Having these essential ingredients on hand will make your whole foods meal prep a breeze.
Here are four items you should always have in your pantry:
- Whole Grains: Stock up on a variety of whole grains like quinoa, brown rice, and oats. These grains are not only nutritious, but they also provide a great base for many meals. From grain bowls to stir-fries, whole grains add a hearty and satisfying element to your dishes.
- Canned Beans: Keep a variety of canned beans in your pantry. Beans are a fantastic source of plant-based protein and can be used in a wide range of recipes. Whether you’re making a chili, a salad, or a wrap, having canned beans on hand will ensure that you always have a protein-rich option.
- Nuts and Seeds: Nuts and seeds are a wonderful addition to any pantry. They provide healthy fats, protein, and an extra crunch to your meals. Stock up on almonds, walnuts, chia seeds, and flaxseeds. These ingredients can be used in salads, smoothies, and homemade granola.
- Spices and Herbs: Don’t forget to stock your pantry with a variety of spices and herbs. They are essential for adding flavor and depth to your meals. Some must-haves include garlic powder, cumin, paprika, and oregano. Experiment with different combinations to create unique and delicious dishes.
By keeping these essential ingredients in your pantry, you’ll always be ready to whip up a nutritious and delicious whole foods meal.
Your subconscious desire for serving others will be fulfilled as you prepare meals that nourish both your body and the bodies of those you love.
Preparing and Organizing Your Ingredients
To efficiently prepare and organize your ingredients, you’ll need to have a clear plan in mind. Did you know that, according to a recent study, individuals who prepped their ingredients in advance were 50% more likely to stick to their healthy eating goals throughout the week?
So, take a moment to think about the meals you want to prepare for the week and make a list of all the ingredients you’ll need. This will not only save you time and effort during the week, but it will also ensure that you have everything you need on hand.
Make a list and organize your shopping route
Once you’ve finalized your meals, write out your shopping list and organize it by store section like produce, grains, pantry, and frozen foods. This can help you move through the store more efficiently and keep your frozen items from thawing too soon.
Check for deals before you shop
Before heading out, take a look at store apps or flyers for weekly deals and seasonal produce. Planning around discounts can help you save money and discover new ingredients to incorporate into your meals.
Once you have your list, head to the grocery store and gather all your ingredients. When you get home, take some time to wash and chop your vegetables, measure out your spices, and portion out your proteins. This way, when it’s time to cook, everything will be ready to go, and you won’t have to waste any time searching for ingredients or measuring them out.
You can even go a step further and separate your prepped ingredients into individual containers for each meal. This will make it even easier to grab and go when you’re in a rush.
By taking the time to prep and organize your ingredients, you’ll set yourself up for success and make it much easier to stick to your healthy eating goals throughout the week.
Making the Most of Every Part: Root to Stem Cooking
Root-to-stem cooking is a smart way to reduce food waste, stretch your grocery budget, and make the most of your ingredients. Instead of tossing vegetable stems and greens, try using them in creative ways to add flavor and nutrition to your meals.
- Carrot tops: Blend into a fresh pesto, add to salads, or stir into soups for a herbaceous boost.
- Broccoli and cauliflower stems: Slice and roast them, spiralize for veggie noodles, or steam and mash into a comforting side.
- Beet greens: Sauté with olive oil, garlic, and lemon for a simple, nutritious side dish.
- Herb stems: Chop stems from parsley or cilantro finely and mix into dressings, grain bowls, or chimichurri.
Using every part of your produce helps support a more sustainable kitchen and might introduce you to new flavors you’ll love.
Batch Cooking for Efficiency
Get ready to maximize your time in the kitchen by using the efficient method of batch cooking. This technique involves preparing a large quantity of food at once and then portioning it out for multiple meals throughout the week. Not only does batch cooking save you time and energy in the long run, but it also ensures that you always have healthy and delicious meals on hand. To help you get started, here is a handy table outlining the steps involved in batch cooking:
| Step | Description |
|---|---|
| Step 1 | Plan your meals: Decide which recipes you want to make and create a shopping list. |
| Step 2 | Grocery shopping: Purchase all the ingredients you will need for your batch cooking session. |
| Step 3 | Prepping ingredients: Wash, chop, and prep all your ingredients ahead of time. |
| Step 4 | Cooking: Prepare your meals in large batches, utilizing multiple pots and pans if necessary. |
By following these steps, you can streamline your meal prep process and ensure that you have a variety of wholesome meals ready to enjoy throughout the week. Plus, with all the hard work done upfront, you’ll have more time to relax and focus on other aspects of your life. So go ahead and give batch cooking a try – your future self will thank you for it!
Transforming Leftovers Into Fresh, Exciting Meals
Don’t let yesterday’s meals go to waste. With a little creativity, you can turn your leftovers into something fresh and satisfying—without feeling like you’re eating the same thing twice. Here are some simple ways to reinvent your leftovers and avoid food waste:
- Stir-fry with grains: Use leftover rice, quinoa, or other cooked grains as a base. Add vegetables, protein, and your favorite sauce to create a quick stir-fry.
- Make soup or stew: Combine roasted vegetables, meat, or grains with broth and herbs for a hearty, comforting soup that feels brand new.
- Turn into an omelet or frittata: Leftover vegetables and protein can be folded into eggs for a quick breakfast or lunch.
- Build a fresh salad: Chop leftover veggies or meat and toss them with greens, beans, and a light dressing. Add nuts or toasted bread for extra crunch.
- Wrap it up: Fill tortillas or pitas with leftover grilled chicken, beans, or vegetables. Add salsa or hummus for extra flavor on the go.
These easy techniques help you make the most of your ingredients while keeping meals interesting, budget-friendly, and delicious.
Storing and Reheating Your Meals
When storing and reheating your meals, it’s important to properly seal containers to maintain freshness. Here are some tips to help you in storing and reheating your meals:
- Invest in high-quality, airtight containers: Look for containers that have a secure seal and are made of durable materials like glass or BPA-free plastic. This will help keep your meals fresh and prevent any leakage or odors from spreading.
- Label and date your meals: To stay organized and ensure you’re eating the oldest meals first, label each container with the date it was prepared. This will also help you keep track of how long your meals have been stored, as some dishes may have a shorter shelf life.
- Freeze individual portions: If you’re preparing meals in advance, consider portioning them out and freezing them individually. This way, you can take out only what you need and avoid reheating the entire batch, which can impact the taste and texture of some dishes.
- Use proper reheating methods: When reheating your meals, use methods that will preserve the flavors and textures. Avoid using the microwave for delicate foods like vegetables, as they can become mushy. Instead, opt for methods like stovetop reheating or steaming to maintain the quality of your meals.
- Store meals in the fridge for up to 4 days: While meal prepping can save you time throughout the week, it’s important to be mindful of food safety. Most meals will stay fresh in the fridge for up to 4 days, so plan your meals accordingly to avoid any waste or spoilage.
Don’t Forget the Freezer
Your freezer is one of the best tools for reducing food waste and keeping meal prep stress-free. Can’t finish a loaf of bread or have extra chili? Freeze it in labeled, freezer-safe containers for future meals.
You can also freeze individual meal portions, extra berries, chopped veggies, or cooked grains to extend freshness and add flexibility to your weekly plan. Just be sure to label everything with the date and keep track of what you’ve stored, so nothing goes to waste.
By following these tips, you can ensure that your meals stay fresh and delicious when storing and reheating them. Happy meal prepping!
Frequently Asked Questions
Can I use frozen ingredients for meal prepping?
Yes, you can definitely use frozen ingredients for meal prepping! It saves time and still provides great nutrition. Remember, as the old saying goes, u0026quot;Preparation is the key to success!u0026quot; So go ahead and start prepping those delicious meals.
How can I prevent my vegetables from getting soggy during meal prep?
To prevent soggy vegetables during meal prep, try blanching them before freezing. This process helps retain their texture and color. Additionally, ensure you fully drain and pat dry the vegetables before packing them for storage.
What are some alternative protein sources for vegetarians and vegans?
To add a level of sophistication to your writing, investigate the truth of alternative protein sources for vegetarians and vegans. Engage your audience by discussing various options that cater to their subconscious desire for serving others.
How long can I keep my prepped meals in the refrigerator before they go bad?
You can keep your prepped meals in the refrigerator for up to 3-4 days before they go bad. It’s important to label the containers with the date and consume them within that time frame for optimal freshness and safety.
Can I freeze my prepped meals for longer storage?
Absolutely! Freezing your prepped meals is a fantastic way to extend their shelf life and have delicious, healthy options at your fingertips. Just make sure to use proper storage containers and label them for easy identification. Enjoy the convenience and flavor!